What is Nginx ?
nginx (pronounced as “engine X”) is a lightweight, high performance web server/reverse proxy and e-mail (IMAP/POP3) proxy, licensed under a BSD-like license.
What is PHP-FPM ?
PHP-FPM is a patch for PHP4/5 to greatly improve PHP’s FastCGI SAPI capabilities and administration. This means that you don’t install php through your distribution’s package manager, but rather download the package from the PHP-website, and the patch from another site. You patch up the sourcecode, compile things, and get it started.
The following is a comparison chart of problems and how php-fpm handles them, when enabled with the FastCGI SAPI:
| Description |
php “out of the box” |
spawn-fcgi + spawn-php.sh + daemontools |
php-fpm |
| php daemonization: pid file, log file, setsid(), setuid(), setgid(), chroot() |
(-) |
(+) |
(+) |
| Process Management. Ability to “graceful” stop and start php workers without losing any queries. The possibility of gradually update the configuration and binary without losing any queries. |
php4 (-), php5 (only graceful completion) |
(-) |
(+) |
| Restricting ip addresses from which requests can come from a web server |
php4 (-), php5 (+) (from 5.2.2) |
(-) |
(+) |
| Dynamic number of processes, depending on the load |
(-) |
(-) |
TODO |
| Starting the workers with different uid/gid/chroot/environment and different php.ini option. You do not need a safe mode! |
(-) |
(-) |
(+) |
| Logging stdout & stderr business processes |
(-) |
(-) |
(+) |
| Emergency restart all the processes in the event of accidental destruction of shared memory opcode cache, if used accelerator |
(-) |
(-) |
(+) |
| Forcing the completion of process if set_time_limit() fails |
(-) |
(-) |
(+) |
Installation
1. Install some dependecies first
# yast2 –install gcc libjpeg-devel libpng-devel libmcrypt libmcrypt-devel pcre pcre-devel libcurl-devel libmysqlclient-devel mysql make wget vim
2. We need to get PHP-sourcecode and php-fpm patch, in this tutorial i use php-5.2.10 and php-5.2.10-fpm-0.5.13
# wget http://id.php.net/get/php-5.2.10.tar.bz2/from/us.php.net/mirror
# wget http://php-fpm.org/downloads/php-5.2.10-fpm-0.5.13.diff.gz
3. Extract and run the patch
# tar xvf php-5.2.10.tar.bz2
# gzip -cd php-5.2.10-fpm-0.5.13.diff.gz | patch -d php-5.2.10 -p1
4. Configure and compile php-5.2.10 and php-5.2.10-fpm-0.5.13 patch
# cd php-5.2.10
# ./configure –enable-fastcgi –enable-fpm –with-mcrypt –enable-mbstring –enable-mysql –with-mysql=/usr/include/mysql –with-mysql-sock=/var/lib/mysql/mysql.sock –with-curl –with-sockets –with-gd –with-zlib –with-iconv –with-dom –with-jpeg-dir=/usr/lib
# make
# make install
5. Installing Init Script for PHP-FPM
# cd /etc/init.d/
# ln -s /usr/local/sbin/php-fpm php-fpm
now make the nginx start on boot
# chkconfig –add php-fpm
# chkconfig –level 345 php-fpm on
6. Installing and configure nginx, when i write this tutorial the latest stable versions are nginx-0.7.61 you can go to http://nginx.net/ for latest nginx sourcode
# wget http://sysoev.ru/nginx/nginx-0.7.61.tar.gz
# tar xvf http://sysoev.ru/nginx/nginx-0.7.61.tar.gz
# cd nginx-0.7.61
# ./configure –pid-path=/usr/local/nginx/logs/nginx.pid –sbin-path=/usr/local/sbin/nginx –with-md5=/usr/lib –with-sha1=/usr/lib –with-http_ssl_module –with-http_dav_module –without-mail_pop3_module –without-mail_imap_module –without-mail_smtp_module
you should see this on the end of configuration
nginx path prefix: “/usr/local/nginx”
nginx binary file: “/usr/local/sbin/nginx”
nginx configuration prefix: “/usr/local/nginx/conf”
nginx configuration file: “/usr/local/nginx/conf/nginx.conf”
nginx pid file: “/usr/local/nginx/logs/nginx.pid”
nginx error log file: “/usr/local/nginx/logs/error.log”
nginx http access log file: “/usr/local/nginx/logs/access.log”
nginx http client request body temporary files: “client_body_temp”
nginx http proxy temporary files: “proxy_temp”
nginx http fastcgi temporary files: “fastcgi_temp”
# make
# make install
now make the nginx start on boot
# chkconfig –add nginx
# chkconfig –level 345 nginx on
7. Installing Nginx Daemon for openSUSE 11.0, you can copy paste this script to your /etc/init.d/nginx
# vim /etc/init.d/nginx
#! /bin/sh
PATH=/usr/local/sbin:/usr/local/bin:/sbin:/bin:/usr/sbin:/usr/bin
DAEMON=/usr/local/sbin/nginx
NAME=nginx
DESC=nginx
PIDFILE=/usr/local/nginx/logs/$NAME.pid
DAEMON_CONFIG=/usr/local/nginx/conf/nginx.conf
test -x $DAEMON || exit 0
set -e
case “$1” in
start)
echo -n “Starting $DESC: ”
start-stop-daemon –start –quiet –pidfile $PIDFILE \
–exec $DAEMON
echo ” started”
;;
stop)
echo -n “Stopping $DESC: ”
if [ -f $PIDFILE ]; then
kill -15 `cat $PIDFILE 2>/dev/null`
fi
echo ” stopped”
;;
restart|force-reload)
echo -n “Restarting $DESC: ”
if [ -f $PIDFILE ]; then
kill -15 `cat $PIDFILE 2>/dev/null`
fi
sleep 1
start-stop-daemon –start –quiet –pidfile $PIDFILE \
–exec $DAEMON
echo ” restarted”
;;
status)
echo “Status $DESC: ”
ps aux | grep -v grep | grep -v /bin/sh | grep $NAME
;;
*)
N=/etc/init.d/$NAME
echo “Usage: $N {start|stop|status|restart}” >&2
exit 1
;;
esac
exit 0
8. Nginx configuration
– Go to nginx.conf on /usr/local/nginx/conf/nginx.conf and remove the #
user nobody;
– Go to/usr/local/etc/php-fpm.conf
# vi /usr/local/etc/php-fpm.conf
Find these two lines. Remove the Comments (arrows)
<!– <value name=”user”>nobody</value> –>
<!– <value name=”group”>nobody</value> –>
If you don’t do this, starting php-fpm will show this error.
fpm_unix_conf_wp(), line 124: please specify user and group othe
– Go to nginx configuration file: “/usr/local/nginx/conf/nginx.conf” , and add the php configuration
location ~ \.php$ {
root /usr/share/nginx/html; # itmena the root of the coument are located on /usr/share/nginx/html
fastcgi_pass 127.0.0.1:9000;
fastcgi_index index.php;
fastcgi_param SCRIPT_FILENAME /usr/share/nginx/html$fastcgi_script_name;
include fastcgi_params;
}
to make index.php to be your web default page add index.php on
location / {
root /usr/share/nginx/html;
index index.php index.html index.htm;
}
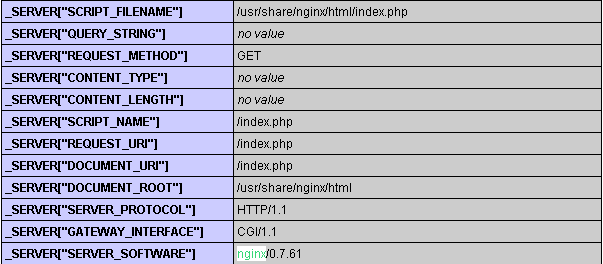
– Go to /usr/share/nginx/html and create php files
# mkdir -p /usr/share/nginx/html
# vi index.php
<?php phpinfo(); ?>
9. Start the nginx and php-fpm
# /etc/init.d/php-fpm start
# /etc/init.d/nginx start
10. You should go to your domain http://localhost/index.php or server address and see the phpinfo


